Hands Free Carrying

The one big problem I found with dowsing and detecting simultaneously is that you need to use both hands and therefore you have no hand free to carry a digging implement. Small digging implements can be carried in a finds bag and for a long time I carried a ‘T’ handled foot assisted trowel on a tool belt, which has worked reasonably well. But now metal detectors go considerably deeper than they have in the past, it has become necessary to use a small spade. In fact I use a Draper Mini Spade with D Handle. The digger is 720mm (28in) long and has a rounded point hardened steel blade with foot bars. The high strength Glass fibre shaft makes it extremely strong yet light, weighing just under a kilogram (2.2lbs). Now I have been able to drag this spade quite successfully by fitting a quick release loop through the D handle and attaching that to a tool belt. That’s fine on a beach or grass or bare earth (it even leaves a trail so you can see where you’ve been) but if, as I often do, you search among growing crops then the crop is likely to be damaged and the farmer won’t be happy. So I needed a way to carry the spade without it making contact with the ground.

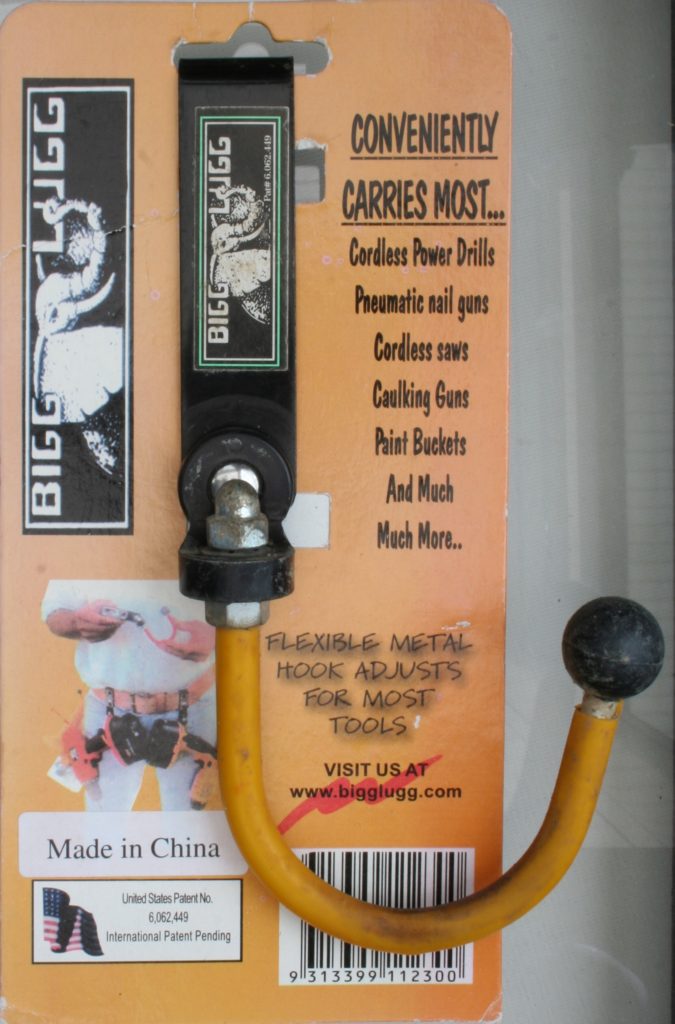
I came across the Bigg Lugg belt hook pictured above (there is also the McGuire-Nicholas 93333 Monster Hook Cordless Drill Holder Holster Belt Clip), which after some experimenting has proved to be the ideal solution. I first tried using the hook on my trouser waist belt on the opposite side to my detector, the problem with that was that the spade acted like a pendulum and kept swinging too close to the detector head and causing a signal. I then remembered, Phil, a detectorist who sadly had lost one arm in a motorcycle accident. Phil used a belt hook to carry his spade behind him, although I didn’t realise at the time why he carried his spade in that position. Once I moved the hook round to the rear, searching became nice and silent once more (until I hit a target, that is). An added bonus was that if I moved too fast the spade tapped gently on the back of my legs to remind me to slow down.

Another slight problem remained, which was the weight of the spade on my waist belt made my trousers slip downward and to keep pulling them up was a bit of nuisance. I resolved that one by using a separate dedicated belt for hook and spade. So I can now dowse and detect simultaneously on any terrain without any distractions.

Categories: Dowsing, Metal Detecting, Treasure Hunting

Gold Test

I changed the bait to gold on the L-rod and spent a further four hours detecting on the same field as the Silver Test (see previous post). The photo illustrates the finds. The first three objects from the left on the top row all have some gold plating remaining, while the fourth object is silver plated copper-alloy. The remaining finds are all copper-alloy. There was also some junk in the form of iron and aluminium although this was minimal.

Now I admit this is not a very scientific test because every time a find is removed from the ground, the conditions of the experiment are changed. You can see this in that the number of finds in the gold test was only a third of the number found in the silver test, for the same amount of detecting time. The law of diminishing returns in action! What is significant though is that in both the silver test and the gold test around one quarter of the finds contained the metal used for bait. If that continues in the field then, I am sure you will agree it must make a big difference to treasure hunting success…

Categories: Dowsing, Metal Detecting, Metal Detecting Finds, Treasure Hunting, X-Factor

Silver Test

I had a small pasture field available, which I had searched in the past and made very few finds. The field had just been mown so searching conditions were as good as they could be and I decided to use the field as a test site for natural finds. I was now using a Detech EDS metal detector, fitted with 12 inch SEF coil, which I had not used on this field before. I baited the rod (see Trust the Greeks, especially when they bear gifts) with silver and used the rod in one hand and my detector in the other, the principle being that the rod guides the detector to the finds. Bear in mind that the brass (copper-zinc alloy), which the rod is made from, forms the largest sample or bait by far, so the rod will naturally find copper alloys and should also find silver because of the added silver bait. There may also be chance finds that you just happen to walk over.

The photo shows the finds made after a four hour search (plus there were three lead objects that I couldn’t fit into the photo). The top row of seven objects all have some silver content (the two George V sixpences are 50% silver) and it is likely that the old lead objects contain traces of silver as an impurity. The rest of the coins and artefacts in the photo are copper-alloy. There was also some junk in the form of iron and aluminium although this was minimal.

Next time, I’ll perform a field test using gold bait…

Categories: Dowsing, Metal Detecting, Metal Detecting Finds, Treasure Hunting, X-Factor

Trust the Greeks, especially when they bear gifts

Continuing on from my previous post, Dowsing for Treasure, the above picture shows one of the L-rods Takis sent me, although I have digitally shortened it.. Actual dimensions are: length 52cm (21in), height 15cm (6in) and return 8cm (3in). The diameter of the rod is 2mm (1/8in) and the sleeve handle 6mm (3/8in) outside diameter; 4mm (1/4in) internal. The only metal (alloy) used in construction is brass. The sample or bait container is a 2ml plastic test tube with screw cap. In the original version above, the tube sat in a short length of foam tubing attached to the back of a self adhesive hook plate (the hook had been removed and the plastic plate threaded on to the rod). However, in the damp British climate, the adhesive bond kept failing so the sample tube now sits horizontally on the rod secured with two rubber O rings or grommets.

The rod can be used either way up. I prefer to use it with the long arm below the hand as shown above, while Takis prefers the rod the other way up, with the long arm above the hand.

The sample or bait tube contains either a pure (or as pure as you can obtain) sample of the metal or substance you seek, or an exact mixture imitating the content of the target you seek. For instance as I am interested in looking for Iron Age gold coins, Takis said I should grind a gold stater coin up to fit in the tube. I refused to do that and the alloy mix in ancient coins varies anyway, so I stick to pure metal samples.

In use, having a swivel handle, I expected the rod to be very sensitive and fly around all over the place but I was pleasantly surprised at how stable it is. It is even very stable in windy conditions, which is probably a result of the thin rod used in construction.

Next time, I’ll perform a field test…

Categories: Uncategorized

Dowsing for Treasure

While, for obvious reasons, there is much secrecy in treasure hunting, now and again you come across someone who willingly shares their knowledge, expertise and even their equipment! Takis, from Greece, is just such a person (and not the only one I might add) and his generosity has instigated a step change in my dowsing and treasure pursuits. “I have seventy dowsing books and this is the best one”. He said, pointing me to Dowsing for Treasure (1984) by Russ Simmons.

Again with Takis’ help, I got hold of a copy of the book, read, re-read and inwardly digested the contents. The greatest insight for me was the principle of using bait, a sample or witness to aid what you want to find. Now, I had not paid much attention to this up until now, I guess because my dowsing mentor was Jim Longton, who was such a good dowser that he just used a basically plain rod, having no real need for accessories. I had discussed the possibility of adding a sample chamber to an L-rod in my book, The Successful Treasure Hunter’s Essential Dowsing Manual, but had not actually used one in my own dowsing, simply because it was clear to me that just using a dowsing rod in one hand and metal detector in the other achieved much better results than using a metal detector alone, so if it ain’t broke, why fix it? Well you live and learn!

“I will make you dowsing rods like I use.” Insisted Takis. I didn’t argue as dowsing instruments are always a bit special when received as an unsolicited gift. And soon two dowsing rods arrived in the mail…

Categories: Dowsing, Metal Detecting

Metal Detecting With The Garrett Ace 250 by Crawfords MD

garrettace250The design of modern metal detectors aims to eliminate many of the hassles and disappointments associated with the hobby. These include the noisiness of a machine going off when it scans over top of any piece of metal, no matter how worthless, and an overly sensitive product. Old machines used to get excited about beer bottle tops, but the new ones can determine what type of metal they are looking at.


Not too Sensitive


The Garrett Ace 250 is a relatively quiet machine in the field. It alerts the user when metal is found but without too much feedback, if any, so you can set it to high sensitivity. Its default setting is fairly high already. The major caveat is that you set your metal detecting device correctly before going out.


When you find something, your machine will let out a sound according to the item. Low tones indicate low-value metal (iron, nickel), but higher tones are indicative of higher-value metal (silver, gold). If you remember the electronic game “Simon Says,” the tones given off by this machine will put you in mind of that old battery operated game.


This means you can read your machine or just listen to it. If you get a crick in your neck after a few hours of metal detecting just listen and stop watching.


Setting your Machine


What this means is pressing buttons (bright yellow on a decent-sized console here) to indicate which metals to be alerted to and which to omit. Use the “discriminate” button to determine if you want the detector to overlook iron, nickels, pennies, etc., or pick up all metals. Set it to a silver-only setting or customize the setting to find exactly what you want. It is advisable to play around with the buttons a little to get the feel for how much you can do with the Ace and how easy it is to press the wrong button.


Screen Size and Setup


The LCD screen is a good size, if a little dark. Be aware that light will affect your ability to read it and you might want to shade the screen which has space to clearly show what metals you are looking for, the sensitivity setting, battery power, and other features. It shows depth from 2″ to 8″+ in 2″ increments.


The Package


A Garrett Ace 250 comes with an instructional DVD, 6.5×9″ coil, batteries, and headphones plus a pouch for storing treasures. Those are nice extras, though you can probably get a lot out of a Youtube video where instructions are concerned. Once you watch the DVD and use the machine just once, this could be easy and fun to use, but there are a lot of buttons to get accustomed to.


Pricing


As a hobby machine, you had better hope to land on a metal-rich bit of beach because this is not cheap but just bear in mind, the Garret Ace 250 works best on dry sand. By shopping around online you can find the best available price, so do not settle for your usual online shopping site. You could be surprised where the best deals are to be found on new metal detecting machines.


Biography

Crawfords MD has been supplying metal detectors to the community for over 15 years. The business was started by Craig Allison who prides himself on respecting customer needs and providing a high quality of service. If you’re in the market for a range of metal detecting equipment, please visit our site: http://www.crawfordsmd.com/

Categories: Metal Detecting, Treasure Hunting

Unique Metal Detector Finds By Daniel Bernzweig

Sharing stories of unique metal detector finds never gets old.  If you enjoy metal detecting, then hearing what’s been found by others is not only fun in and of itself, but, it also wets your whistle so to speak and gets your mind racing with thoughts of what you might find during your next treasure hunt.

With that in mind – here’s Daniel Bernzweig of MetalDetector.com to share with us some of the most unique finds he’s heard about over the years.

Champagne in Finland

Several divers in Finland located a treasure stash of champagne bottles, with champagne still in them!  We’ve heard of many antique bottles of all kinds being found all over the world, but rarely are the original contents inside.  And even rarer is the fact that in this case the original contents happened to be incredibly high quality champagne; made even more so by its 170 years at the bottom of the Baltic Sea.

Full Model T Ford

modelTford

Metal detectorists in Detroit, Michigan found a full Model T Ford!  A former owner of the property apparently buried the car in his backyard back in the 1920s to save it for posterity.  It seems his goal was reached.

Personal Finds

Some of the best metal detecting stories involve helping others out.  An example of this is when one person lost their dental work at a nearby lake and a metal detectorist searching the beach was asked to help.  Of course he gladly searched the area and found the man’s missing bridge work easily.

In fact, several hobbyists I know (and many I don’t) also make themselves available, usually for no charge, to others to help find lost treasures that mean a lot to someone like wedding rings for example.  They enjoy the search and also know how much these items can mean to others that it’s a win for everyone.

After all you never know what you might find when you go out metal detecting.  Maybe on your next adventure you’ll find something unique or even helpful to someone else.  Whatever you find when you head out with your metal detector though, you’re sure to find some fun!

Biography

Daniel Bernzweig manages MetalDetector.com in Southborough, MA. He has written on the subject of treasure hunting and metal detecting since the mid 1980’s. He enjoys traveling with his metal detector and helping to educate others in the correct use of  metal detectors in their explorations.

Categories: Metal Detecting Finds, Treasure Hunting

Nazi Gold

I was recently sent this video by a Greek treasure hunter and thought it was worth sharing. The video is in English with Greek subtitles.


Θανάσιμα Μυστικά ~ Αναζητώντας τον χρυσό των… by KRASODAD

Categories: Treasure Hunting

Gold Auras


gold chain

Many people say gold does not give off an aura and they’re absolutely right – if the gold is not influenced by an electromagnetic field.

I was sent this photograph of a lady’s gold neck chain she was wearing, taken with a Canon DSLR camera fitted with an infrared filter. Had the chain been placed on a table and photographed in the same way, it would have produced a pretty uninteresting more or less blank picture. But because the gold is being excited by the electromagnetic field produced by the wearer it is emitting infrared radiation that is being picked up by the camera. This is exactly what happens when gold is buried and excited by the Earth’s electromagnetic field, which is a lot stronger.

A graduate scientist explained this process fairly simply to me. Gold, as all substances, is made up of atoms. Atoms consist of a dense positively charged nucleus surrounded by negatively charged electrons, all being held together by electromagnetic force. Under the influence of an electromagnetic field the electrons are excited into an orbit further from the nucleus and then spontaneously return to their normal orbit releasing energy in the form of infrared radiation.

Categories: Treasure Auras

Film for Polaroid Cameras


PX70aura

As many of you will know, with the rapid advancements in digital cameras, Polaroid ran into difficulties and the Dutch factory was sold to the management. The factory, under the name of The Impossible Project, is again producing SX-70 film to a different formula and slightly faster speed. The first of the new film was called PX-70 Color Shade but that has now changed to PX-70 Color Protection. I bought a box of 8 PX-70 Color Shade and tried it on my test site, which only contains a very small amount of gold (1/4 oz) and silver (2 oz). Happily the film has produced an aura, which you can see to the left of centre. This seems to show that it is the SX-70 Single Lens Reflex camera that produces the auras, rather than the film. So if you are buying an SX-70 camera for aura photography, make sure you get the SLR type which views through the lens. The non-SLR or box type has a separate viewfinder. For film and refurbished cameras, start here:

http://shop.the-impossible-project.com/allabout/colorshade/

Categories: Dowsing, Orbs, Treasure Auras, Treasure Hunting, X-Factor

Proudly powered by WordPress Theme: Adventure Journal by Contexture International.